Getting Started
1. Creating a Demo Account
The CopySafe site enables visitors to create a demo account to upload their own documents, explore DRM settings and download protected documents to evaluate the many different ways that a document can be protected. Approval for new demo accounts is automatic, providing the new account is validated. Otherwise, the process is quite simple:
- Complete and submit this online registration
form.
- Check your email for a request to validate your new membership.
- Click the link in that email to validate your email address.
- Now you can log into the DRM Portal.
Warning: Creating a demo account here can affect your access rights to
an existing account, so if you are already subscribed to documents
published by authors using this system, do NOT create a demo account and
instead, wait to receive your instructions from that author. If you have
not received instructions from an author within 24 hours of purchasing
an eBook, please contact that author.
2. Installing the CopySafe PDF Reader
To read protected PDF on your desktop and online from web pages, you
need to download and install the
CopySafe PDF Reader. The first time that you run the Reader
and open a protected PDF, you will be prompted for a username and
password. Please use the username and password that was sent by email
when you signed up. This log-in is required only for the first time that
you open a protected PDF, so that your computer can be associated with
your membership account. Thereafter, the system will recognize your
account and privileges by the ID of your computer.
Note: Your account is recognized by your unique computer ID, so we strongly to use only one membership per computer. You may access documents as the admin/author if you want to test them, but if you need to test from another account or while not having approval to use the document, please do so from a different computer.
3. Uploading a Test Document
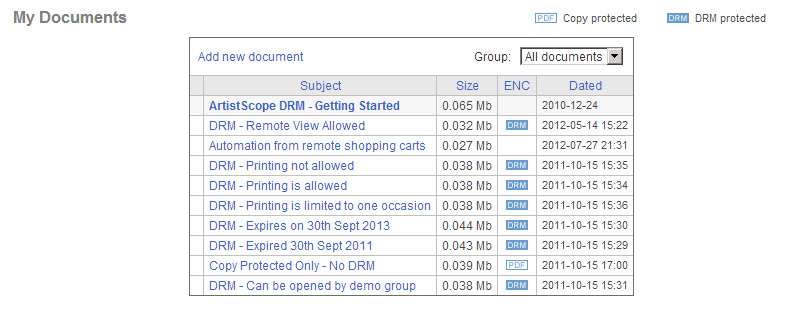
When logged into the DRM Portal, you will see links for Documents and
My Documents. Any new documents that you upload will appear in
this list. The documents already listed that begin with "DRM" are
provided for your evaluation. You can download any of these documents by
clicking their link. When downloading protected documents, it is most
recommended to Save File to disk rather than open from the web because
once saved, you never have to download again.
To upload a new document, simply click on the link for "Add New Document".
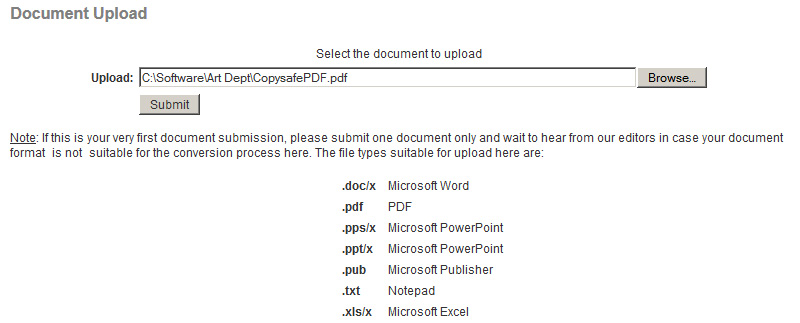
To upload, click on Browse to locate the file on your computer,
and then click Submit to send it to our server.
As you can see, you can upload a variety of different file types. PDF is the preferred format, but uploading original Word files is also possible because when the server converts the file to PDF, it will be 100% compliant. Should any PDF fail to display properly after being converted to protected PDF, you can always upload the original file as a fall back. .
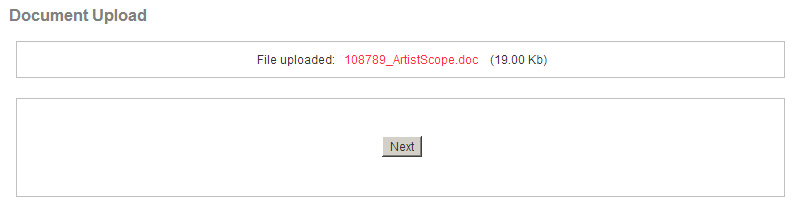
Your document has now been uploaded. Click Next to convert it to
protected PDF and submit the details required for indexing.
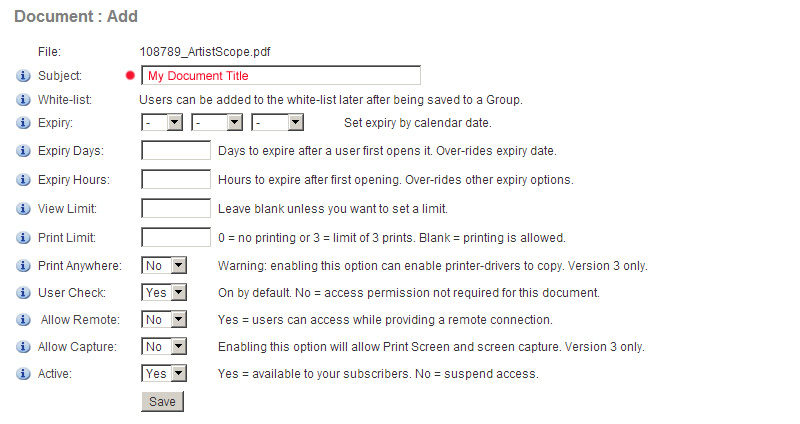
Here you have many different options and the only mandatory field is for the document Title. For an explanation of what each option
is for, click on the [?] beside it and a pop-up window will display a
description. These options can be edited later and changed at any time.
With our DRM, any changes made will have immediate effect, even on documents that
may have already been downloaded and saved to a user's computer.
Type in the Title at least, and then click Submit.
You can change the document's DRM settings at any time by clicking
Edit.
Now you have one of your own documents in the system. As a Demo
account, those are the only settings that will be required. However,
if you have a full Author account in our DRM Portal, then you will
be able to add new subscribers and also add the document to our eBook
Store. For more information on how to add your eBook to our store,
see the eBook Store section below.
Downloading a Test Document
Documents can be distributed to subscribers using different methods:
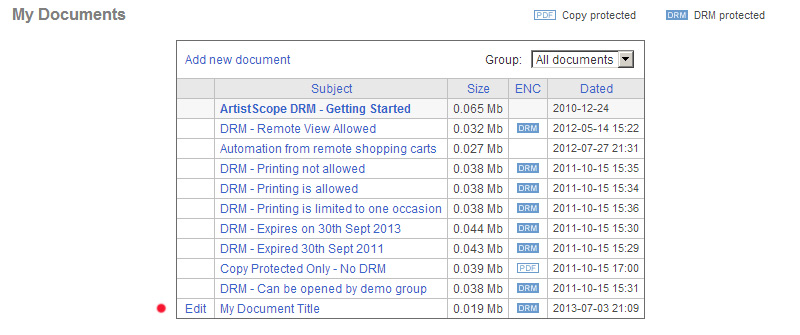
- By download from the Document index that is available to all
users when logged in. See the image above - clicking on any of the
documents will provide the option to Save or Open from the web.
- When adding new subscribers, the eBook that they purchased can be
sent by email with their new login and install instructions.
- By using the Newsletter function, a document can be selected
and mailed to individual Users or members of Groups that
you manage.
- By download from your own website - such files should be zipped
(ZIP).
- By sending as an attachment to emails from your desktop.
Note: When downloading any files from the web, one should always save to
disk and then open them from there because when opening from online they
will always be saved to cache and with encrypted files, you may have to
download them over and over again. Saving to disk is the best option.
Opening a Test Document
The CopySafe PDF Reader will open any protected documents that have been copy-protected only without limitation. But if DRM has been applied, as we have explored above, then you will be prompted for a username and password the first time that you open such a document. Once you submit those credentials, the system will recognize you automatically from your unique computer ID.
Demo Accounts
Demo Account Limitations
If you have a Demo account, only you will be able to view any documents that you upload to the system in the Documents index. This is so that you have complete privacy while testing. However, your documents can be opened by other users if you send them the download link or a copy of the file, ie: all
Demo users can open all documents belonging to the Demo group.
After 14 days, your log-in will no longer provide access to the DRM tools
and any documents created by you will expire. However, your log-in
will remain active for the purpose of accessing the
Online Book Cover Designer.
As a Demo user, you can only access basic functions. Others will not be available for access such as extensive tools and reports for user, document and group management, reports for eBook sales and usage tracking. Those functions are only available to members who have full Author status. Author accounts are provided for free to all licensed users of the CopySafe PDF Protector software and other users who may have opted to pay for our DRM Service.
Author Accounts
Total Control Management
As an Author you have total control over your documents and subscribers
and the groups that they belong to. A full explanation of all the
options is provided in this User-Guide.
Authors need to pay particular attention to the difference between
Group and eBook permissions.
When familiar with the difference between Copy Protected
and DRM documents for which this portal was designed,
you can then move forward and start preparing for online sales of your
eBook. DRM-protected documents and eBooks are managed from this portal,
but they can be distributed from anywhere. This means that if you have a
website and/or shopping cart, you can promote, sell and provide
downloads of your eBook from that site or anywhere else. Then as you
make a sale, you can add that new subscriber to your DRM Portal here.
New subscribers can be added manually or it can be automated. You can
sell from your own website or from our eBook Store alone or
both. But first, you need to convert your Document listing to an
eBook listing by providing some more information.
Author Limitations
Authors can create new groups, add users and documents but there are
some limitations with what can be deleted from the system. For example
"groups" can be suspended or renamed but they cannot be deleted. Also,
users added as "eBook users" cannot be deleted and may not be editable
when the user does not belong to a group owned by the author. These
limitations are by design to prevent mishap. So if you need to have
groups deleted, first check that no documents or users are assigned to
the group and then email admin to have it removed. Otherwise, you should
be able to rename and recycle groups and if you need to disable any
user, group or document, you will be able to edit their details and set
Active = No.
Passwords and file name limitations
The minimum length for passwords is 8 characters and they are limited to
numbers and letters only. All other characters are illegal and will be
removed. Such removal can shorten the password to less than 8 characters
which will prevent a user from logging in. Also, to save confusion all
passwords are converted to lower-case before recording and conversion.
File names are also filtered to ensure that they cannot trigger errors
and contain no spaces or other illegal characters that may prevent them
from being delivered via generic mail and web services.
Converting Documents to eBook Status
Primarily, you need to have your Documents already uploaded and the DRM
settings applied. DRM settings are what govern a user's access but the
Store settings are the ones used for display of your eBook in our Store.
Warning: There is a vast difference between eBook and Group permissions.
For a full explanation, please read the general
User-Guide.
If you are selling eBooks online, then you will want to use eBook
permissions, so you can assign individual books to users as
they are purchased. However, to ensure that new subscribers cannot
access all of your eBooks, eBook Users and your eBooks
need to belong to separate Groups. The easiest way to ensure this
is to assign all documents sold as eBooks to a separate Group and not
assign any any Users to that Group at all. Then, when you add an eBook
permission, the User will be assigned permission to that eBook
only (regardless of which Group he belongs to).
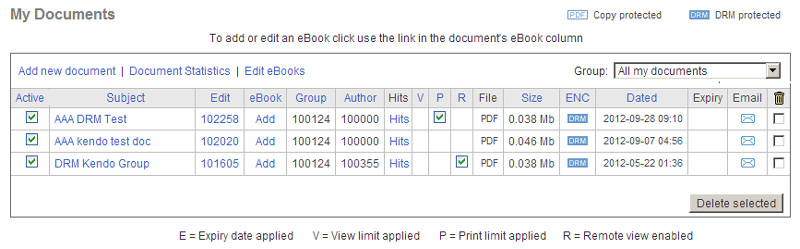
Now, let's convert a Document to eBook status by clicking on the
Add link in the eBook column:
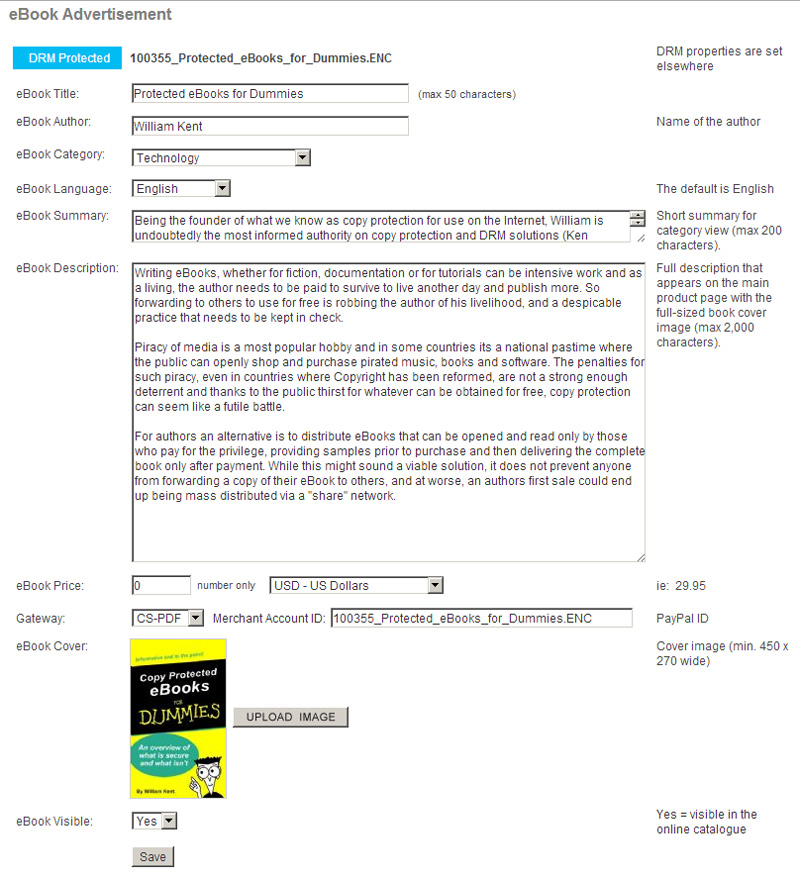
Here you can add all of the information that you need to advertise your
eBook including summary, description and price:
As a Demo user, you can only access basic functions. Others will not be available for access such as extensive tools and reports for user, document and group management, reports for eBook sales and usage tracking. Those functions are only available to members who have full Author status. Author accounts are provided for free to all licensed users of the CopySafe PDF Protector software and other users who may have opted to pay for our DRM Service.
eBook Store Visibility
Now that you have seen how to convert a Document to an eBook and list it in
our eBook Store, you need to realize that you do NOT have to convert
Documents to eBooks if you are selling from your own or another website.
eBook Cover Image Design
You can design your image using any tools at your disposal or you can use
our online
Cover Design Tool. Once you have your image, you can upload it
using the button at the bottom of the eBook settings page. Suitable
image types are GIF, JPG and PNG of good quality and at least 450 pixels
high x 270 pixels wide. Any images that are smaller than this will
result in degradation of quality because any images uploaded here will
be rescaled to the final size of 270 pixels wide and 450 pixels deep.
eBook Store Sales via PayPal
Selling your eBook is the easiest to set up. All you need to do is add
your PayPal account information and then set your PayPal account to
observe return links. Return links are necessary for successful
transactions to return from PayPal and automatically add the new
subscriber and/or their purchase to your DRM Portal.
The information provided in your eBook settings governs how the
information is displayed and what links are provided to site visitors.
Even for free distribution, you need to be careful to input the correct
information. The image below depicts a typical eBook that has been set
for free distribution. By providing the file name, the user will see a
"Download" button, instead of a "Buy" button. As to whether the eBook is
DRM-protected or not is governed by your settings when it was uploaded
as a "Document".
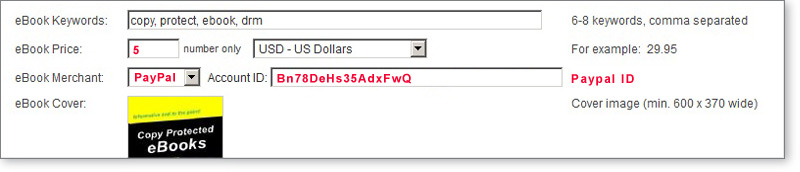
The currency type needs to match the default currency set in your PayPal
account. The AccountID is the email address that you have used as your
PayPal account identifier. From a successful transaction, the visitor
will be redirected to our online store to automatically subscribe to
this eBook. To test your settings, make one of your eBooks $1 and follow
the instructions for the sale through the catalog to PayPal. You may
have to pay using a different PayPal account if you are going to
purchase via the same account because they have some restrictions purchases
using the same account.
Note: For PayPal transactions to automatically add new users and
their subscriptions, you need to allow PayPal to return to our order
form after a successful sale. When our store sends your purchase to
PayPal, it includes the return link to use. But unless you allow this
feature in your PayPal account, it cannot happen.
Enabling PayPal Transactions to Update Subscriptions
Log into PayPal and then go to My Profile > My Selling Tools > Website
Payment Preferences
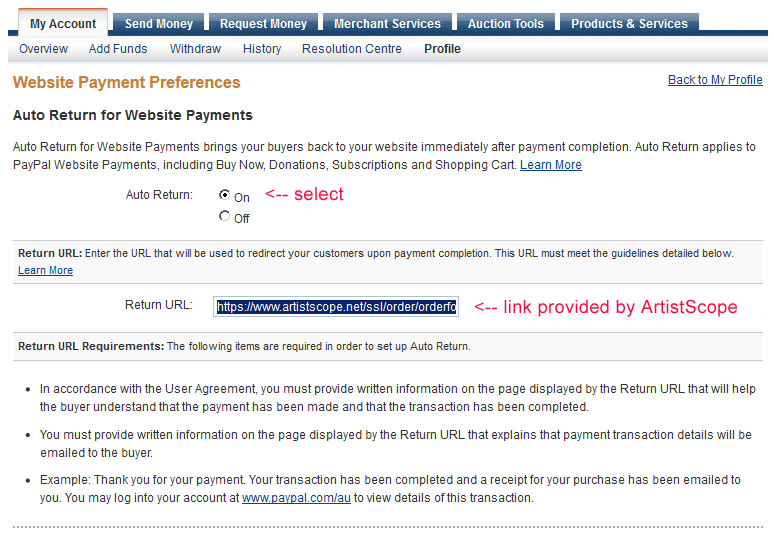
You can hard code the return link or leave it blank. Either way, that new return link should be used when our form submits new information. The main part of this form is where you select to approve return links.
eBook Sales & Auto Subscription
Unless specifically disabled for your account, all successful
transactions made via PayPal can automatically add a subscription for
the purchased eBook. Note the emphasis is on "can", which means it depends
on the visitor if he wants to get redirected back to the online store
after paying using PayPal or not. If the user does not opt to “continue
shopping” and get redirected back, then the sequence will be
interrupted. In such cases, you will have to manually add the user and
should always check that all sales have been delivered from the store.
Otherwise, the sequence that follows will prompt the system to add the
user, if the individual is not yet in your user base or it will update
an existing record. That individual may be added as an eBook user and
assigned the rights to use the eBook that was purchased. If that user already
belongs to another group (another author), then his or her account settings
may not be editable, however, if you ever need to remove their
subscription, then you can do that without affecting that user's account.
eBook User Creation From Shopping Carts
It is also possible to automatically add new eBook users, following a
successful transaction from your own shopping cart, regardless of where
it is hosted. Custom return pages can be created free-of-charge as
outlined in this document.
Shopping Cart Integration.
Return to top
|